Step2. Create the DB main table
Database Connection
In order to hold any data entries or users for example in our app, we need a database. And to have that we have to link that database with to our project via editing the .env file from the app root directory like the following:
DB_CONNECTION=mysql   <-- Database connection type
DB_HOST=127.0.0.1     <-- Database ip address (localhost most of the time)
DB_PORT=3306          <-- Database connection port
DB_DATABASE=laravel2  <-- Database name
DB_USERNAME=root      <-- Database username
DB_PASSWORD=          <-- Database password
Database Design
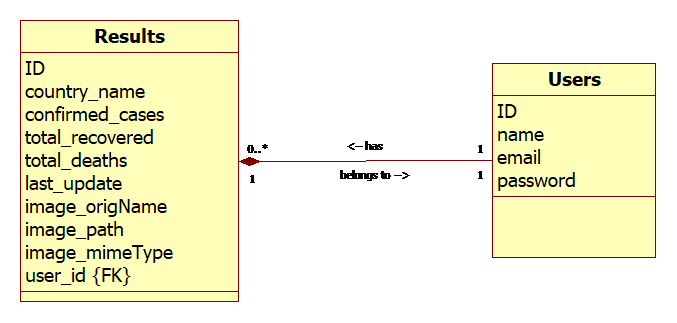
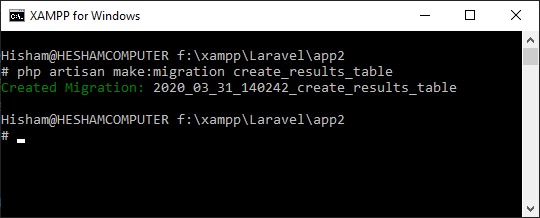
You use Laravel-Artisan commands to create tables and relationships. For creating a new table called ‘Results’, we should use the following CLI command to create a migrate file:
php artisan make:migration create_results_table
Now we should edit the migration file for columns names and data types etc.
        Schema::create('results', function (Blueprint $table) {
            $table->id();
            $table->string('country_name');
            $table->integer('confirmed_cases');
            $table->integer('total_recovered');
            $table->integer('total_deaths');
            $table->date('last_update')->nullable();
            $table->string('image_origName', 100)->nullable();
            $table->string('image_path', 100)->nullable();
            $table->string('image_mimeType', 100)->nullable();
            $table->timestamps();
        });
For a full list of the available methods: https://laravel.com/docs/5.0/schema
For Authorisation purposes, I added another migration file, later on, to include the user_id as a foreign-key (explained it in another post):
        Schema::table('results', function (Blueprint $table) {
            $table->unsignedBigInteger('user_id')->default('1');
            $table->foreign('user_id')->references('id')->on('users')
            					->onDelete('cascade');
        });
Step3. Create the MVC
I created the main blade file manually to test the routes. I called it results.blade.php
Then I have used the following artisan command to create the model and controller together notice the ‘-c’ after the command for adding the controller file in just a single line:
php artisan make:model Result -c
and we have now two more files generated automatically with the basic code for the controller which is responsible for generating the HTML in the DOM and the model which will prepare the data to inject it to the HTML where needed.
And by now we took care of the M&C or Model and Controller only. Now, it is time to create the View with the next step.
Step4. Templating
I created one file and called it layout.blade.php which will hold all the repeated HTML code that needs to be in every single page of the web app, such as the <head> tag with all the libraries and scripts inside it and the <footer> tag.
And from now on; only the unique content will be in all other blade pages, while we can use the layout file we just created to contain any header, styles and scripts we need to use repeatedly in the HTML, and that can happen by using @extends(‘layout’); at the top of those other blade files.
And to know where our unique content will go in the template file we will use the directive @section to wrap what we need from the target file and inject it wherever we need it to appear in the template file by using the directive @yield.

The basic screens flowchart

Step5. Create & Test the main form
I created a form in the create.blade.php view file with the help of Bootstrap classes to cover all the needed fields.
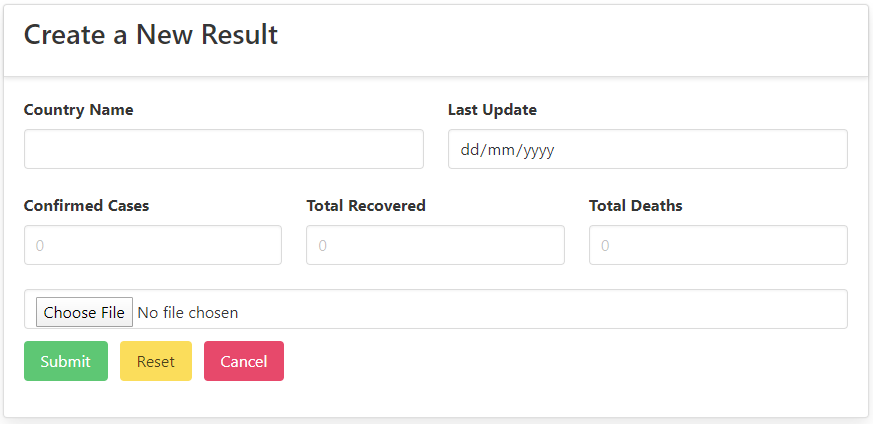
I wired up the Submit button with the store() method as a form action and via the route file web.php, so every time the user will hit the submit button, his request will be posted through the route URL localhost/results/ and will be handled thereafter by the controller ResultController.php with the method store().
The other two buttons, the Reset button is to clear the form fields from any data and the Cancel button is to get back to the previous screen without saving any new results.
<form method="POST" action="/results" enctype="multipart/form-data">
  ...
<button class="button is-link is-success" type="submit">Submit</button>
// Route to save a result in the database
Route::post('/results', 'ResultController@store');
public function store(Request $request)
{
...
// get form's normal input fields
$result->country_name = request('name');
$result->confirmed_cases = request('cases');
$result->total_recovered = request('recovered');
$result->total_deaths = request('deaths');
$result->last_update = request('date');
$result->user_id = Auth::id();
// the uploaded image submission details if there is a file
if ( $image ){
$result->image_origName = $image->getClientOriginalName();
$result->image_path = $image->store('flags', 's3');
$result->image_mimeType = $image->getMimeType();
}
// saving the data into the MySQL database
$result->save();
return redirect('/results')->with('success',
'The new result added successfully!');
}Step6. Adding Form Validation Rules & customized messages
To prevent the users from submitting a gibberish input into the results table we must set some rules to validate the data and accept only the sensible entries.
We can validate data on Laravel by passing the Request to validate() function to see if the values of the form are following the rules. And of course, there is a number of methods to do so. I wrote the following lines inside the store() function in the controller (notice the messages for each possible error in the second array):
        $request->validate([
            'name' => 'required|max:25|alpha|unique:results,country_name',
            'cases' => 'required|numeric',
            'recovered' => 'required|numeric',
            'deaths' => 'required|numeric',
            'date' => 'nullable|date',
            'flag' => 'nullable|image|mimes:jpeg,png,jpg,gif,svg|max:2048'
        ], [
            'name.alpha' => 'The country name shuld not contain numbers!',
            'name.required' => 'The country name is required!',
            'name.max' => 'The maximum allowed characters are 25!',
            'name.unique' => 'This name is already exist!',
            'cases.required'  => 'The number of cases is required!',
            'cases.numeric'  => 'This must be a numeric value!',
            'recovered.required'  => 'The number of recovered cases is required!',
            'recovered.numeric'  => 'This must be a numeric value!',
            'deaths.required'  => 'The number of deaths is required!',
            'deaths.numeric'  => 'This must be a numeric value!',
            'flag.image'  => 'This must be an image file!',
            'flag.mimes'  => 'Accepted extensions are jpeg, png, jpg, gif and svg!',
            'flag.max'  => 'The maximum allowed file size is 2MB!',
        ]);
Here is the resource of all the validation stuff from Laravel documentation: https://laravel.com/docs/6.x/validation
As a second layer of security, we can add a client-side HTML simple validation rules inside the <input> tag; by adding the word required for example or adding the type=”number” or type=”date” as appropriate.

Step7. Passing on the Success Messages
For better user experience on our app we can show a message to the user if the entry has been saved successfully in the database, and since we are redirecting the user after the form submission to the /results page so we must show that message somewhere on that page.
Here how I did it, first, I added ->with after the return at the end of the store() function:
return redirect('/results')->with('success', 'The new entry added successfully.');Then I added the message output on results page right after the table:
@if(Session::has('success'))
  <div class="alert alert-success">
    <button type="button" class="close" data-dismiss="alert">×</button>
    {{ Session::get('success') }}
    @php
    Session::forget('success');
    @endphp
  </div>
@endif
We are telling Laravel here; if the session has a success message? then get it and show it in a div tag with some classes. after that forget or delete that message from the session.
I also added an X button to close that div by the user after reading it.

Step8. Adding file upload feature with AWS->S3 bucket setup
As usual Laravel was generous enough to make this also as easy as just adding AWS credentials and one line of code.
The only confusion was whether to but that information within app/config/filesystems.php file or inside .env environment file. As there were two different approaches in online tutorials, and after many tries, I managed to get that to work. It turns out that the old versions of Laravel were using the filesystems.php file but not anymore.
The Steps:
- I created an account with Amazon Web Services,
- I requested the service S3 from my dashboard there,
- created a new app for the project and called it laravelcoronaapp,
- added a new folder and called it Flags,
- changed the folder access control to accept read/write from/for all public requests,
- got my Access Key ID, Secret Access Key and all the other details and copied them over to my .env file.
Then whenever needed to send a file to S3, we just need to pass it with store() method with two arguments like:
$image->store('flags', 's3');And whenever needed to delete a file, we just need to pass it with delete() method like:
Storage::disk('s3')->delete($result->image_path);Step9. Adding Pagination
This was an easy improvement, however, it needs to be more advanced. So, we can add some sorting options such as Order-By each table column by clicking on its heading.
But for now, this is how I did it; I updated the request in the index() method in the controller to look:
$results = Result::orderBy('confirmed_cases', 'desc')->paginate(5);And then I added the following line in the blade file after the table:
{{ $results->links() }}The URL now has a new fragment ?page=n like so: http://127.0.0.1:8000/results?page=1
Now, the main results page is looking as following:
